Saturday, March 29, 2008

Chicken BOBO Pizza

Pizza on the Big Green Egg is as close to brick oven pizza as you can get without the brick oven. This recipe utilizes store bought ingredients and doesn’t require you to prepare pizza sauce and with NO LOSS OF FLAVOR OR ENJOYMENT. Give it a spin!

Ingredients
2 Chicken Breasts – Boneless, Skinless
1 12 “ Boboli Pizza Crust Regular not Thin
1 Pkg. Boboli Pizza Sauce (1/2 cup)
2 Cups Mozzarella Cheese – Shredded
1 Cup Colby-Jack Cheese – Shredded
Shaker Shredded Parmesan Cheese Kraft
½ White Onion
¾ Large Green Pepper
½ cup Sliced Olives with Pimentos
Olive Oil
4 cloves Garlic

Preparation and Cooking Directions1) Remove Grill and Preheat and stabilize Big Green Egg to 400 degrees.
2) Insert Diverter rack and stabilize temperature.
3) Slice VERY thin all vegetables and set aside (use a ceramic slicer to get them paper thin)
4) Slice Chicken breasts into quarters and brown in Olive Oil and garlic until 95% done (juices will be running)
5) Remove from heat and dice, set aside.
6) Place Boboli Crust on a BGE Pizza Stone
7) Rub Olive Oil on crust then spread Boboli Pizza Sauce evenly
8) Add 1 cup of Mozzarella Cheese, Chicken and the Colby Jack Cheese
9) Add the remaining vegetables and cover with remaining Mozzarella Cheese
10) Sprinkle Parmesan Cheese (to taste).
11) Place in Big Green Egg, Close Cover and cook for 23-25 minutes and DO NOT PEEK!
12) Open BGE, slice with pizza cutter right on the Pizza Stone and serve directly to plates.

Friday, March 28, 2008

Grill Marks Around the Globe

The word Grill actually refers to the grid of wire (rack) on which the food is cooked and Grilling is a form of cooking using grills (duh). The definition of grilling apparently varies depending on where you are in the world however. In North America, the word grilling refers to cooking food directly over Charcoal or Gas flame on a grate that will leave "grill marks." This type of cooking (grilling) would be referred to as barbequing in the United Kingdom. The term Barbecue in the U.S. however doesn’t necessairly mean that you get grill marks on your meat. Traditional Japanese homes (and many in China and Korea) have hibachis that are used for cooking (grilling). Grilling on a habachi is done directly over hot charcoal at very high temperatures.

Now…if you LOVE THOSE GRILL MARKS use a rag to wipe some vegetable oil on the grill after you scrape it clean and just before you put it away for the night (if the grate is still just a little warm, all the better). Then the next time you heat up the grill for those steaks, run up the temperature and immediately “sear” in those juices, picking up the meat with tongs (never poke holes in your meat) and flip it over and “sear” the other side for 1 or 2 minutes…wala! Grill Marks (however if you cook it right, the presentation of the meat won’t be remembered as long as the flavor…so don’t worry about it! The secret is in the oil on the grate and the temperature. Let that meat rest by the way (to relax the meat) and lower the temperature and then cook away. You do only flip your meat once anyway, right? Right?

…and just WHAT gives Grilled Meat that distinctive taste? The Maillard Reaction! The maillard reaction[1] is what gives grilled meat the taste. This chemical reaction is the term for the browning of meat and is what distinguishes ‘grilling out’ from all other methods of cooking.


1 Information gathered from http://en.wikipedia.org/wiki/Grilling

Thursday, March 27, 2008

Direct versus Indirect Cooking

There are two methods to grill food over a gas, wood, charcoal, or infrared - direct or indirect cooking. Using the direct heat method, the food item is placed directly over the flame or coals. This method exposes the food item to very hot temperatures, often in excess of 500F or 900F for infrared grills. This is the fastest way to cook food items on a grill. The food items are cooked by the flames and radiant heat coming from the heat source of the grill. The direct heat method is used for grilling steaks, hamburgers, hot dogs, sausage, pork chops and skewers. The food items must be carefully monitored and turned frequently so as to not burn them.

Using indirect heat, you place the food item so that it is not directly over flames or coals. This is done by having the fire or coals on only one section of the grill and placing the food item on a part of the cooking grill opposite the flames or coals - for example, having the burners going on the right side of a gas grill but off on the left side or placing the coals on the right side of the grill and no coals on the left side. In a charcoal grill, when indirect grilling it is best to place a foil pan of water under the food to keep it from drying out. Using the indirect grilling method is best for large cuts of meat or bone-in poultry. It allows the food to cook all the way through without burning or charring on the outside of the meat.
On the Big Green Egg there is a plate setter insert (pictured here) that you place under the grill rack to facilitate indirect cooking, no BGEggHead should be without one! Other examples of items that are used for indirect cooking on the BGE include Baking Stones (also pictured here).


Sources: http://en.wikipedia.org/wiki/Grilling & Photo copied off Google Image site

Wednesday, March 26, 2008

Good Meat = Good Eats!

There are two mistakes people make when grilling after spending hundreds of dollars on a nice outdoor grill. First, they buy cheap meat. Second they compound this error by just slapping it on the grill (and no amount of steak sauce will fix either of those mistakes).

You shouldn't even fix your plain old standards like hamburgers with no thought or preparation so always plan ahead; Buy good meet and put some thought in to preparing even the simplest of hamburgers and your grilling experience will be much more rewarding each and every time.

Regardless of the meat that you plan on grilling you need to splurge on “the good stuff.” That means passing up the prepackaged beef and pork at the grocery store and driving directly to a full time butcher shop. You will get better, fresher and higher quality meat products well worth the delta in price (and sometimes it really isn’t that much more expensive per pound) versus the results you will receive.

Grilling out is not a race; it is an art...the art of preparing food well!

Monday, March 24, 2008

Looking for Pizza Sauce Recipe

I want to cook a chicken breast pizza on my Big Green Egg this weekend and I've come up with a pretty good set of ingredients sans a simple, but tasty pizza sauce recipe.

Got anything to share?

If I use it, I'll give you credit and post the recipe for the pizza after I'm done eating it this weekend. Give me something to work with gang!

Are my recipes copyrightable?

Though we think of cooking as art, that does not make a recipe copyrightable.

"A mere listing of ingredients is not protected under copyright law. However, where a recipe or formula is accompanied by substantial literary expression in the form of an explanation or directions, or when there is a collection of recipes as in a cookbook, there may be a basis for copyright protection." — The Copyright Office of the US Government

"A list of ingredients cannot be copyrighted. An idea, concept, system or method of doing something cannot be copyrighted either. Only the substantially literary expression associated with a recipe can be copyrighted. To the extent there are only so many ways to say "boil water" it is not creative, or therefore protected as copyright. However, If the recipe directions or description are a wholesale copy of another person's creative literary expression, they are in violation of copyright. So even if the recipe originated elsewhere, even if the ingredients are still the same, if the directions and descriptions of your posted recipe are "(essentially) "in your own words, it is your recipe."

(Thanks to the Recipe Zarr website for this great information)

Saturday, March 22, 2008

Spiral Stuffed Pork Tenderloin

Nothing can beat well prepared, ‘butt rubbed’ pork tenderloin and this recipe bursts with flavor. Using boneless, skinless pork tenderloin and just a few simple ingredients you’ll never think of tenderloin the same again; serves well as leftovers.

Ingredients Recommended1 or 2 Pork Tenderloin (1.25-1.5 lbs) Skinless and boneless
Baby Spinach Leaves Fresh
Chopped Garlic cloves Substitute Garlic Salt
Bundle Green Onions Whole
Garlic Pepper Seasoning Big Green Egg Brand
Olive Oil
Rub Bad Byron’s Butt Rub Get yours at Buttrub.com
Optional Asparagus and/or Mozzarella cheese Fresh

Preparation Directions
1. Spiral cut the tenderloin and spread flat
2. Coat both sides lightly with olive oil
3. Lay spinach leaves (or asparagus, or both), chopped garlic cloves, Garlic Pepper Seasoning (to taste) and whole green onions toward one end.
4. Roll up and tie with cooking twine
5. Rub the outside with Bad Byron’s Butt Rub

Cooking Directions
1. The Big Green Egg temperature should be stabilized at 4500
2. Place Loin directly on the grill and seal all around (with lid open)
3. Remove from heat for 5 minutes (let the meat relax)
4. Close lid and reduce stabilize heat at 250-260 degrees.
5. The loin will need to cook for 60 to 90 minutes (and remember if you are looking you are not cooking!)6. You should use a meat thermometer to track the temperature until it reaches 155-160 degrees
7. Remove from heat, slice and serve hot.

Recommended Side Dishes and Deserts• Red Skin Potatoes, Brussel Sprouts and Jalapenos on the side
• Iced Tea with Lemon

This recipe was first discovered and ‘borrowed’ from the http://www.outdoorhome.com website and subsequently modified (thank you)

Thursday, March 20, 2008

Safe Defrosting of Meat (When A Fresh Cut of Meat Just Isn't An Option)


There is nothing that compares to a fresh cut of meat from the Butcher; but if you have a freezer full of meat there are only 3 Safe Ways to Defrost Meat


  • In the refrigerator (recommended method)

  • In cold water

  • In the microwave (not recommended for a good cut of meat)

Thawing in the RefrigeratorAs long as the refrigerator temperature is between 34° and 40°F, thawing in the refrigerator will be safe. Use a plate or pan under thawing meat to make sure dripping does not spill on foods, especially foods to be eaten without additional cooking.

After thawing in the refrigerator, ground meat should be used as soon as possible. Once meat has been frozen and thawed, it will deteriorate more rapidly than if it had never been frozen. Whole meat cuts (chops, roasts) will remain useable for another 3-5 days in the refrigerator before cooking. Meat defrosted in the refrigerator can be re-frozen without cooking, although some quality may be lost. The USDA recommends that meat defrosted by other methods be cooked before refreezing.

Thawing in Cold WaterMeat can be safely thawed in cold, not hot, water. Be sure to thaw meat in a leak-proof package or bag. Submerge the bag in cold water, changing water every 30 minutes so that is stays cold. It is important to keep the meat out of the food spoilage temperature range of 70° to 100°F.
After defrosting, refrigerate or cook promptly. Unlike meat thawed in the refrigerator, meat thawed by the cold water method should be cooked before re-freezing.

Thawing in the Microwave
Meat can also be safely thawed in the microwave, although it may be more difficult to retain meat quality, especially if the microwave power is set too high. Remove store wrap and foam trays before defrosting in the microwave. Thaw on low power so that microwave energy penetrates to the center of the meat. Most microwave ovens have a “thaw” setting and may suggest an amount of time and turn schedule to prevent loss of meat quality. Meat thawed in the microwave should be cooked immediately after thawing. However if you listen to the Ugly Brothers you will be committing a sin using this method by partially cooking your meat before it even gets to your Big Green Egg.
Source of Information - http://web.extension.uiuc.edu/meatsafety/preparation/thawing.html

Wednesday, March 19, 2008

Just what IS a Big Green Egg?

The Big Green Egg is a super efficient machine (from the BBQ Report - See Links)
The Big Green Egg is made of ultra-efficient, insulated ceramics. The ceramic walls are heavy and thick allowing you to grill or barbecue foods with a greately reduced amount of charcoal. The manufacturer claims that a 20lb. bag of natural charcoal will usually provide four to six months use, even if you cook out several times per week. No matter how hot it gets inside however, The Big Green Egg’s exterior is always relatively cool to the touch.


When you are through cooking, just close the lid and the top and bottom draft doors to extinguish the fire. You can reuse about 60-80% of the charcoal. When you do burn up your charcoal, it burns down pretty much to the last ash, making cleanup a breeze. The Big Green Eggs ceramic insulation also retains moisture extremely well. For this reason, foods do not dry out, as they can in metal charcoal, gas, or electric grills. Natural juices and flavors enhance the taste without the need for water or endless hours of tending. Meats and other foods are juicier, with little or no shrinkage.
The Big Green Egg: its a smoker, a grill, its an oven…
Its ability to retain heat is complemented by very predicatble heating. By adjusting the dampers, you can attain a temperature accuracy within two degrees. You have total control. A heat gauge will give precise readings of temperature, from 50° to 750°. This means you can use The Big Green Egg for a variety of tasks. You can do your grilling, barbecuing, smoking, and baking at exactly the temperatures you need.

Tuesday, March 18, 2008

LUMP CHARCOAL ?

Understanding Lump Charcoal[1]

The guys that convinced me to buy the BGE sold me on the wonderful quality of their food cooked with Lump Charcoal. I had no idea it even existed...and I too am converted now so here is a primer that I found on the internet that told me just about anything you would want to know...

Natural "Lump" Charcoal is known to be more efficient, healthier and controllable than briquettes or any prefabricated charcoals.

The Process - Natural Lump Charcoal comes from partially burning wood. It is also created by heating wood without oxygen. In doing so, this charred wood becomes carbon. During the process of making charcoal, volatile compounds in the wood (water, hydrogen, methane and tars) pass off as vapors into the air, and the carbon is converted into charcoal.

The Properties - Since Charcoal is pure wood carbon, it weights much less than its original state. It is also free of tars (which can contain carcinogenic compounds, like benzo-a-pyrene). Perhaps only traces of volatile components can be found in charcoal. Definitely not enough to alarm neither nutritionist nor scientist. Unlike Charcoal Briquettes, which holds different chemicals, natural charcoal is merely 100% carbon.

How long can Lump Charcoal last (Shelf Life) - Lump Charcoal is perhaps good for life. Unless it has been exposed to moisture and variable temperature, natural lump charcoal will last.

Charcoal Silhouettes - For cooking purposes charcoal comes in two different shapes: lump charcoal and briquettes. Lump charcoal is charcoal which has not been formed into briquettes. Briquettes are the pillow shaped little pieces of compressed ground charcoal.
Should you use Lump Charcoal or Briquettes?
If you are going to use a Ceramic Grill or Cooker of ANY kind the answer is Lump Charcoal. The low ash production of lump charcoal is very important. Ceramic grills and Smokers have a fire bowl holding the charcoal. As the charcoal burns, the ash falls down into the bottom of the bowl. There isn't room for a whole lot of ash. Lump charcoal tends to burns hotter and faster than briquettes. Lump charcoal will also burn at whatever rate and temperature that you allow it to. Briquettes tend to burn slower as they were designed to be used in an uncontrolled environment.

Types of Lump Charcoal - There are 2 types of charcoals: the first type comes from natural wood which has been cut and made into charcoal. This is as natural as you can get. The wood comes from trees, branches and scrap pieces from saw mills. The second type comes from using processed scrap wood and tuning it into charcoal. Processed scrap wood tend to burn faster since its density is lesser than natural. This is mainly because there is less moisture into the wood at the time it is transformed into charcoals. This wood comes from wood flooring scraps, building material scrap and furniture scraps and others.

Quality Lump Charcoal usually comes in a multi layer paper bag to absorb moisture. Commonly, lump charcoal is sold in a 20 lbs bag.

Lighting Lump Charcoal - Never use any starter fluid. It will give a undesirable flavor to your food and impregnate into the ceramic of your Primo Grill and Smoker. There are many other ways to light up lump charcoal. You can use paraffin fireplace starter blocks (Primo recommended), electric starters, propane sticks, weed burners, propane torches, MAP gas torches and Chimney starters. The Chimney starter is the most economical since it uses paper (usually newspaper) to light the charcoal.

You should never use lighting fluid for your ceramic charcoal grill and smoker.

[1] http://www.primogrill.com/charcoal.html

Saturday, March 15, 2008

Spatchcocked Chicken


This recipe gives you a very simple method of cooking whole chickens on the BGE (or ‘Split’ breasts) in less time than it normally takes to cook them whole. The origin of “Spatchcocking” is allegedly 18th-century Irish and means "to butterfly".


Ingredients Recommended
1 Whole young chicken (Spatchcocked) Have the butcher do this for you!
Option 1 - Rub Substitute Cuban Mojo Sauce
Option 2 - Cuban Mojo Sauce Substitute Rub

Preparation Directions [1]
1. Spatchcocking the chicken: With a sharp kitchen knife or poultry shears, cut the backbone out of the chicken. Turn the chicken over and press and flatten. If you find that the chicken doesn't want to stay flat, you can use two skewers in an "X" pattern to hold it flat or,
2. Pull out your already prepared chicken or split breasts and place in a 9 x 9 or larger plan.
3. Marinate in Mojo for two hours in the refrigerator before placing on the grill.
Option 1: HIGHLY RECOMMENDED - Inject some Mojo into the individual chicken breasts!
Option 2: Rub with Cuban Style Mojo and let set overnight (in the fridge)

Cooking Directions
The Big Green Egg temperature should be stabilized at 3500
Place chicken cut side down directly on the grill
Expect to Cook a whole chicken for about 1 hour without flipping.
Breasts will take about the same amount of time but you should use a meat thermometer to track the temperature until it reaches 160 degrees (I know most guides say 170 -180 degrees but it will be dry!) because the breasts will be a little thinner than the split whole chicken

Recommended Side Dishes and DesertsBaked Potatoes and Corn on the Cob
Cuban (or French) bread heated up on the BGE with some Garlic Butter Spread
Jalapenos and Green Onions (with EVERY meal)!
Roasted Marshmallows for Desert over hot coals - ALWAYS!

[1] Most of these directions are ‘borrowed’ from The Naked Whiz (thank you)

Sunday, March 2, 2008

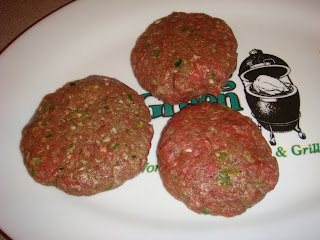
Ground Sirloin Burgers


Ground Sirloin Burgers
Calling these “Hamburgers” just won’t suffice if you are asked to describe these wonderful burgers. Quick, simple and filling, these burgers are easy to prepare and great tasting.


Note: This recipe is for 3, how many you prepare becomes a matter of multiplication…
Ingredients

1 Lb Ground Sirloin 85-15 and NO LEANER or these burgers will be dry; you need SOME fat to cook
2 Medium Green Onions, Diced
2 Garlic Cloves, peeled and diced
2 Tbs Steak Sauce; A1 preferred, but you choose
1 pkg. Mozzarella cheese, grated You can do Colby, parmesan, jack etc.
Preparation Directions1. Combine ingredients in mixing bowl and mix well
2. Form into 3 ‘thick’ patties on Wax Paper
3. Optional step: Place patties in refrigerator for two hours. (holds burgers together better on the grill when they are just starting)
4. Cook per directions below and sprinkle Mozzarella cheese over the top just before removing meat
Cooking Directions1. The Big Green Egg temperature should be ran up to 650 degrees or higher
2. Place burgers on grill
3. Sear on both sides (about one minute each and you do not have to close the lid for this step)
4. Flip burgers one more time and close lid of BGE
5. Regulate the temperature around 400 degrees
6. Cook on each side for 2 minutes for medium rare (does take some practice and depends on the thickness of your meat but 1/3 pound burgers will be pretty thick and will work well at these times.
7. Remove from heat and serve with condiments on the side (that MUST include Jalapenos)

Recommended Side Dishes and DesertsCorn on the Cob
Fries on the grill
Salad